Understanding the NLP Pipeline: A Beginner's Guide to Building Smarter Language Models
Natural Language Processing (NLP) is the magic behind chatbots, translation apps, and voice assistants that seem to "understand" us. But how do these systems make sense of human language? The answer lies in the NLP pipeline, a structured process that transforms raw text into actionable insights. Whether you're a beginner curious about AI or an aspiring data scientist, this blog will break down the NLP pipeline in a simple, engaging way. Let’s dive into the steps and uncover how machines learn to understand words!
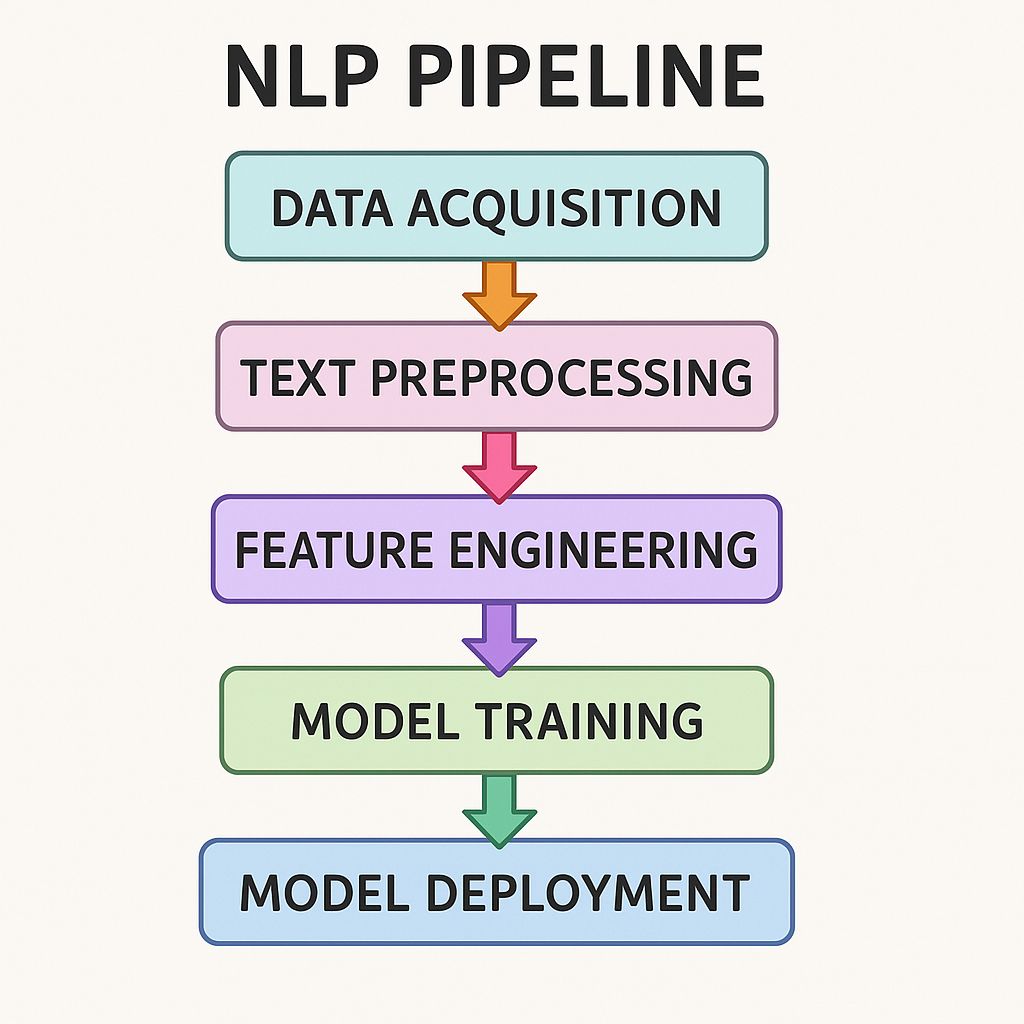
📌 What is the NLP Pipeline?
Think of the NLP pipeline as a recipe for turning messy, human-written text into something a computer can understand and work with. It’s a series of steps—data acquisition, text preparation, feature engineering, modeling, deployment, and monitoring—that work together to build intelligent language systems. But here’s a key point: this pipeline isn’t always a straight line. Sometimes, you’ll loop back to earlier steps to refine your work. Plus, deep learning pipelines have their own twists, which we’ll touch on later.
Let’s explore each stage of the NLP pipeline, step by step.
🗄️ Step 1: Data Acquisition
Every NLP project starts with data. Without text to analyze, there’s no pipeline! Data acquisition is about gathering the raw material—think tweets, customer reviews, books, or even audio transcripts. You might:
- Scrape the web: Collect blog posts or product reviews (ethically, of course!).
- Use APIs: Pull data from platforms like X or Reddit.
- Leverage datasets: Use publicly available datasets like Wikipedia dumps or Kaggle datasets.
- Collect proprietary data: For example, a company’s customer support chats.
The challenge? Data can be noisy, incomplete, or biased. For instance, social media text might include emojis, slang, or typos. Your job is to gather enough relevant, high-quality data to fuel the pipeline.
🧹 Step 2: Text Preparation
Once you have your data, it’s time to clean and shape it. Text preparation is like prepping ingredients before cooking—it makes everything easier later. This step has three sub-stages:
Text Cleanup
Raw text is messy. It’s full of HTML tags, special characters, or irrelevant punctuation. Text cleanup involves:
- Removing HTML tags or URLs.
- Stripping out emojis or special symbols (unless they’re important for your task, like sentiment analysis).
- Correcting misspellings or standardizing formats (e.g., “U.S.” to “United States”).
Basic Preprocessing
Next, you simplify the text to make it machine-readable. Common tasks include:
- Tokenization: Splitting text into words, phrases, or sentences (e.g., “I love NLP” becomes ["I", "love", "NLP"]).
- Lowercasing: Converting all text to lowercase to avoid treating “NLP” and “nlp” as different words.
- Removing stop words: Filtering out common words like “the” or “is” that don’t add much meaning, depending on the problem you are solving.
- Stemming or lemmatization: Reducing words to their root form (e.g., “running” to “run”).
Advanced Preprocessing
For more complex tasks, you might need advanced techniques, like:
- Part-of-speech tagging: Labeling words as nouns, verbs, etc., to understand their role.
- Named entity recognition (NER): Identifying names, places, or organizations in the text.
- Dependency parsing: Analyzing sentence structure to understand relationships between words.
By the end of text preparation, your messy text is clean, structured, and ready for the next step.
🔢 Step 3: Feature Engineering
Now that your text is clean, you need to turn it into numbers—because computers love numbers, not words. Feature engineering is about creating numerical representations of text that capture its meaning. Some common methods include:
- Bag of Words (BoW): Representing text as a collection of word counts (e.g., how many times “happy” appears).
- TF-IDF: Weighing words based on their importance in a document relative to a collection.
- Word Embeddings: Using pre-trained models like Word2Vec or GloVe to represent words as dense vectors that capture semantic meaning (e.g., “king” and “queen” are close in vector space).
- Sentence Embeddings: Creating vectors for entire sentences or paragraphs, often using models like BERT.
Feature engineering is where you get creative. For example, if you’re building a sentiment analysis model, you might focus on words that signal emotions. The better your features, the smarter your model will be.
🤖 Step 4: Modeling
This is where the magic happens! Modeling involves building and evaluating the machine learning or deep learning model that will process your text.
Model Building
You choose a model based on your task (e.g., classification, translation, or text generation). Common choices include:
- Traditional Machine Learning: Algorithms like Naive Bayes, SVM, or Random Forests for simpler tasks like spam detection.
- Deep Learning: Neural networks like LSTMs, CNNs, or Transformers (e.g., BERT) for complex tasks like chatbots or translation.
- Pre-trained Models: Fine-tuning models like GPT or BERT for faster results.
You’ll train the model on your prepared data, tweaking parameters to improve performance.
Evaluation
Once your model is trained, you test it. Evaluation metrics depend on the task:
- Classification: Accuracy, precision, recall, F1-score.
- Text Generation: BLEU score or human evaluation for fluency.
- Sentiment Analysis: ROC-AUC or confusion matrices.
Extrinsic and intrinsic evaluations are also important, with extrinsic evaluations assessing the model's impact on real-world applications and intrinsic evaluations focusing on the model's internal performance mentioned above.
If the model underperforms, you might loop back to earlier steps—tweak features, clean data differently, or try a new model. This non-linear nature of the pipeline is key!
🚀 Step 5: Deployment
Your model is ready—now it’s time to put it to work! Deployment involves integrating your model into a real-world application, like a chatbot on a website or a sentiment analyzer for customer feedback. This might mean:
- Hosting the model on a cloud platform (e.g., AWS, Google Cloud ..
Deployment isn’t just about code—it’s about ensuring the model runs smoothly in a production environment with real users.
🔍 Step 6: Monitoring and Model Update
The job doesn’t end after deployment. Models need constant monitoring to ensure they perform well over time. Why? Because language evolves—new slang, trends, or events can make your model outdated. Monitoring involves:
- Tracking performance metrics (e.g., accuracy on new data).
- Detecting concept drift, where the data distribution changes (e.g., new words emerge on social media).
- Gathering user feedback to spot issues.
If performance drops, you’ll update the model by retraining it with new data or tweaking the pipeline. This ongoing process keeps your NLP system relevant and accurate.
🔑 Key Points to Remember
- The Pipeline is Non-Linear: You might revisit earlier steps based on evaluation results or new data. For example, poor model performance might send you back to feature engineering or data acquisition.
- Deep Learning Pipelines Differ: Deep learning pipelines often skip traditional feature engineering, as models like Transformers learn features directly from raw text. They also require more data and computational power but can handle complex tasks like contextual understanding.
- Iterate and Experiment: NLP is as much art as science. Experiment with different preprocessing techniques, features, or models to find what works best for your task.
🌟 Why This Matters
The NLP pipeline is the backbone of countless applications we use daily—from search engines to virtual assistants. By understanding each step, you can build smarter, more effective language models that solve real-world problems. Whether you’re analyzing customer feedback, automating translations, or creating a chatbot, the pipeline guides you from raw text to meaningful results.